Thursday, December 18, 2014

Making of a fatbob dash panel


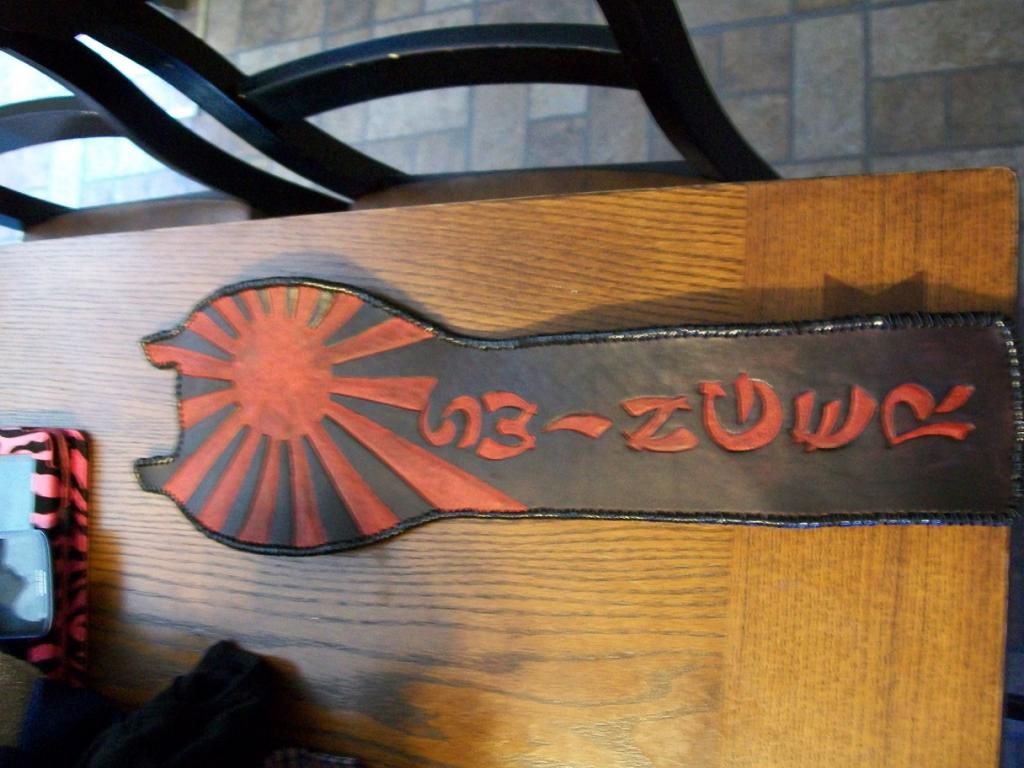
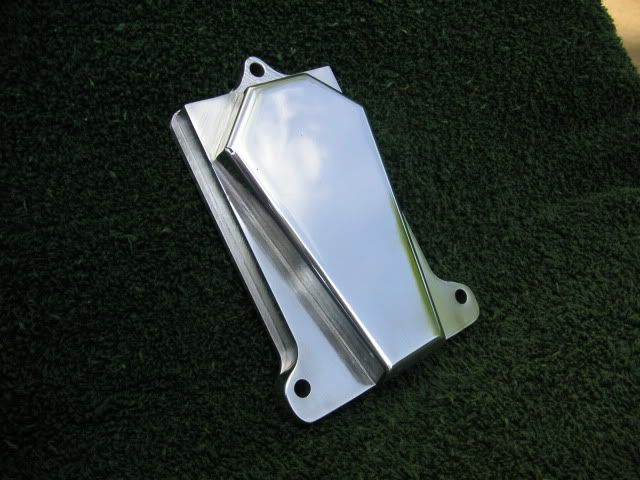
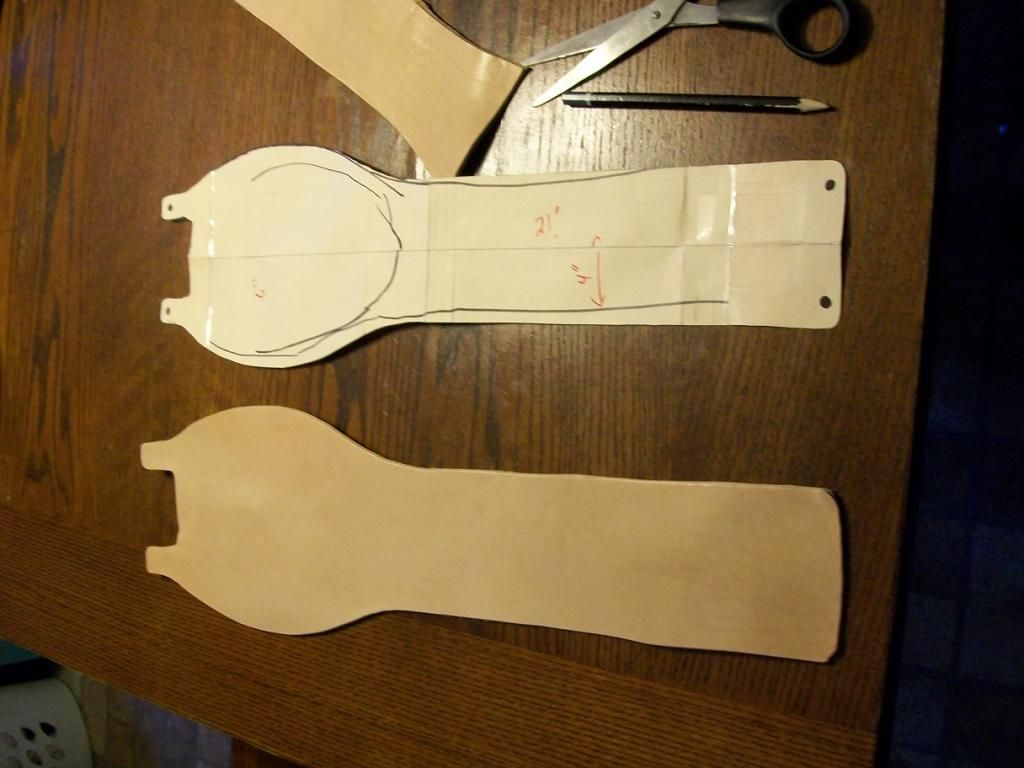
Welcome back to the wacky world of Wizard.  This is the first of what i plan to be several how to write ups on leather work. I have asked myself a few times what is it we love about motorcycles?  I have found that the action of building is as enjoyable to me as riding.  It is an act of creation when we take things in a raw form and we transform them into working parts of a machine.  With that in mind I have documented a recent project I was asked to do by a fellow Honda chopper head.  What I was asked to make is a tank panel or dash for split tanks.  This was fairly straight forward.  I received a pattern in the mail to work from with all the holes marked for the tie downs.  I want to say here that this makes all the difference with projects like this you must have a good pattern to work with.  Take a bit longer on this step and it will save you so much time in the long run. 

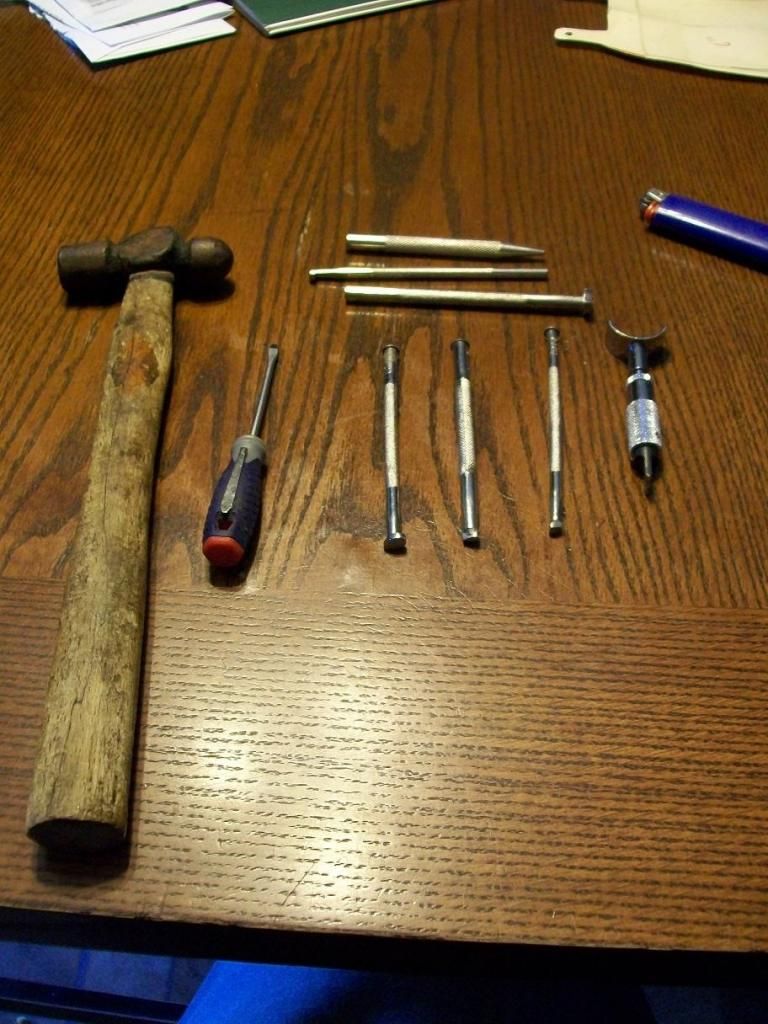
 Ok I have laid out my tools here for you to see I have swivel knife a few bevel tools and a background tool a small flat head screw driver and ball peen hammer lots use a mallet but the tiny hammer was a gift and I like it.  The lighter is because I like a cigar with my coffee and has no bearing on the work. 


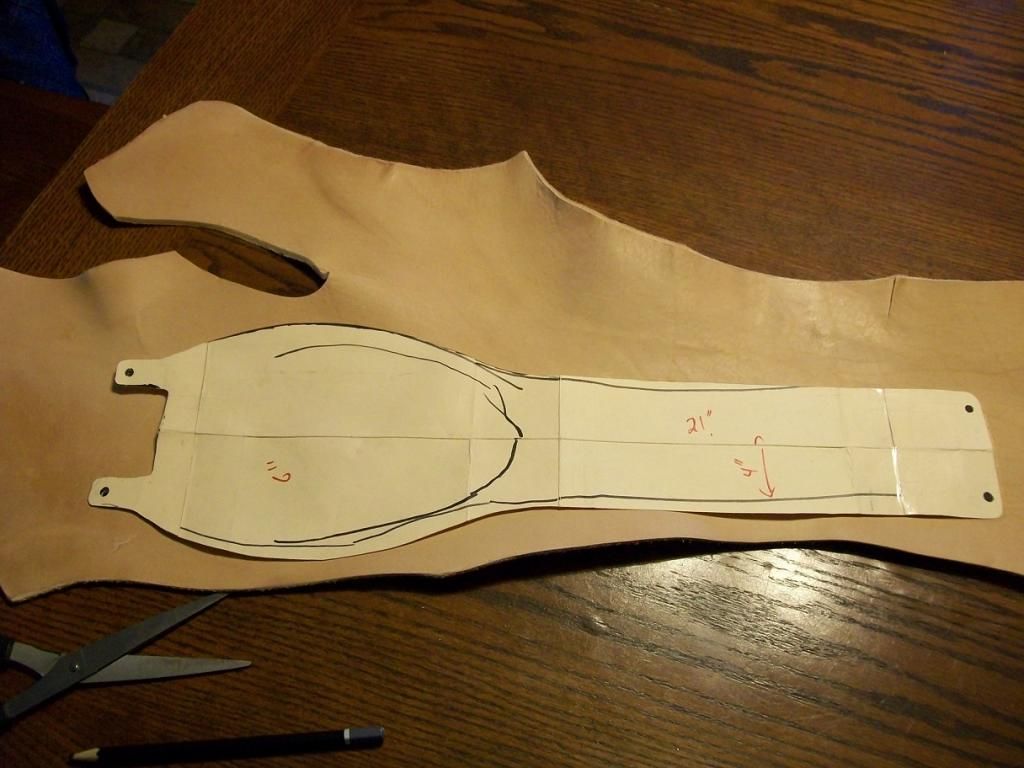
The first step is to look at the leather and find a good spot to work with that has no blemishes and is of the same thickness and texture.  When you do this lay the pattern on the leather and trace it with a pencil then  using very sharp scissors or shears depending on the thickness cut the leather out.
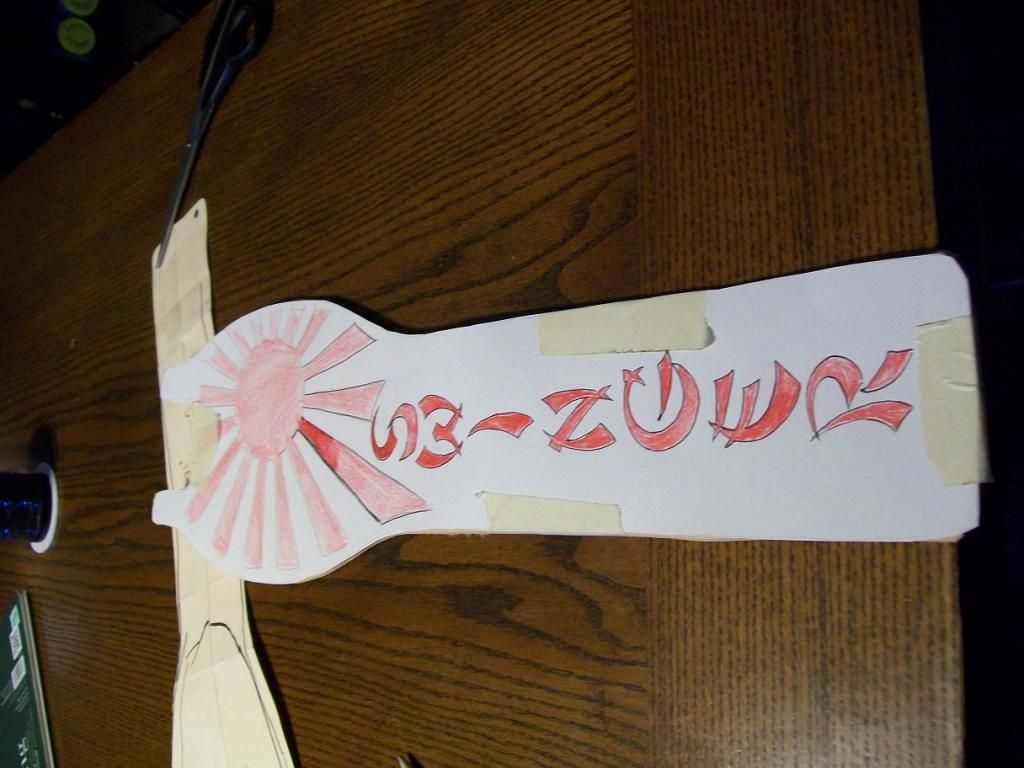
  
Step two. At this point I have the art work ready but it is really up to you what you use.  It is as simple as printing out a picture you like.  For this one I drew it up because I like to draw.  Lay your art on and tape it in place I like to use painter’s tape it is important you only tape on the back of the piece so it does not damage the front.  Now trace the picture pressing fairly hard.  You can use a stylus or I like a ball point pen that is out of ink.  This leaves an impression in the leather that you can work from. 


Step three is to remove the art and I give a quick trace of the art with a pencil and then wet the leather in cool water.  It is important that you know once wet leather is very easy to tool you can leave a lasting mark with a finger nail so all 
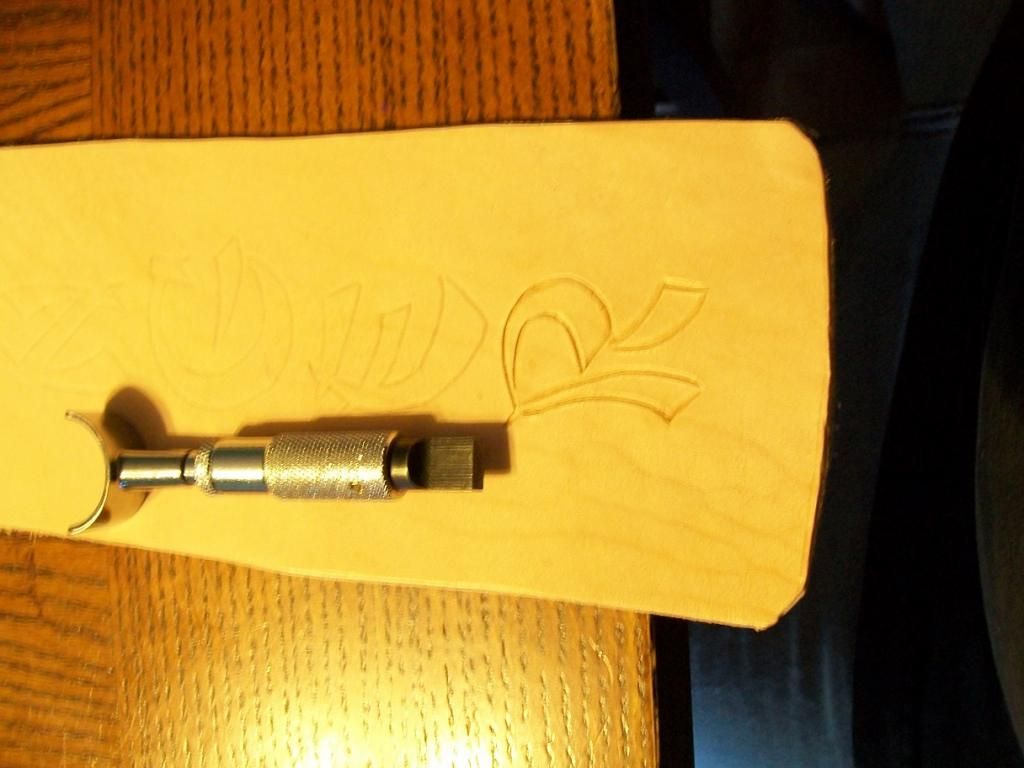
rings watches and such off to avoid accidental damage.  Now trace the design with the swivel knife applying pressure and following the pattern. 


Step four we take our bevel tool and hammer and place it in the trench we made with the knife and tap the tool this will create a nice beveled edge to the design.
Now that the edge is beveled you take the background tool and in the same manner as the bevel tool you begin to fill in the space over lapping the tool marks.  On this project I dropped the design in but could have left it and tapped the rest in it is really a personal choice and it is important to note not all designs will require this step.
Once this is done we punch the lace holes I like to lay mine out by hand but they can be measured and spaced with a ruler also. 
On to the dye.  I prefer to dye my lightest colors first and work out from there for instance the red then black it works well for me.  I apply the dye or stain with an assortment of paint brushes based on the size of part I am painting.  Once you have done this and it dries I like to add a little leather conditioner Tandy makes a good 4 in 1 also neatsfoot oil works well.
Now get your lace and go to town I will do an entry later and show some different methods but that is a discussion all its own.  She is tooled laced conditioned and bam she is done. Slap her on and ride that thing.  

Saturday, December 6, 2014

Monday, November 24, 2014

Monday, October 27, 2014

Builder Spotlight Jimmy ( Copperheadz)


           Welcome back guys and gals to another builder spot light.  This month it is my pleasure to bring you Jimmy Roberts or to all those floating around the HondaChopper.com forum Copperheadz.  First I would like to thank Jimmy for taking the time to do this interview.  He is a standup guy and makes some of the nicest parts out there for the SOHC Honda.  If you are building one of these bikes take a look at his stuff you will not regret it.  Now kick back relax and enjoy.

Wench Junkies: How did you first get into wrenching?

Jimmy:  I was raised on a farm  and like most folks, we repaired the equipment ourselves. Back in the day, there was better stuff in the junkyard than what we were using on the farm.  So you learn fast on how to fix things. Had a couple old dirt track cars back in the early 70's, now that was fun.  Street division my man. Knock the windows out, install the roll cage and we're off to the races. There was always something to do to those cars, engine, rear end you name it, it happened. Never did win a race, that was the times.

WJ: Man I bet that was a blast.  Knowing that you have a background not only in agriculture but also racing explains a lot about you attention to quality and precision when you are building parts as well as motorcycles.  Speaking of motorcycles when did I make the first step towards motorcycles?

J:  My friend down the road had just bought his first bike, it was a 1965 Honda 50 WHOOO HOOO we went everywhere on that bike. I remember he only had one helmet, we found an old plastic football helmet took the face guard off & that's what I used.  We never did get pulled over by the pokie.  3 or 4 years down the road, there was a family that moved in the area from Fort Wayne, Ind. THOSE GUY'S HAD CHOPPER's,  panhead & shovelhead Harley's. WOW!!!  15 feet long, well, that's what they looked to me.  Another guy up the road had a Honda cb750 (Hammer) Jeff Henley. RIP.  They took that 750 apart, bought a hardtail frame, Harley rear tire, dragpipes & raked her out. That was the badness thing that ever hit the ground. Love at first sight.

WJ:  Sounds to me like you got bit by the bug the same way a lot of us did.  I have often wondered if we took a poll how many of us got started building because of that one super cool guy.  Bad part is once that building bug bites you are done good times and bad. On that line of thought what about motorcycles do you find most rewarding?       

J:  Most rewarding for me is to build a nice chop & see the end results. You've got to have a vision & make it happen.  My first build was the Tennessee Moonshiner.

WJ:  That is an awesome build that showcases what is possible when to really decide to make it happen but you know I gotta ask when things are going smoothly what you find the most challenging.

J:  The most challenging thing to me are those cb750 Carbs, I see & read were guy's take them apart 2 or 3 times a week to get them right & I've never had a set apart. Took the bowls off, set the floats & cleaned the jets that's about as far as I'll go. May be a phobia for me.

WJ: I think it is a phobia for more than just you lol.  I know when I got started on my build man they scared me.  I can tell you if we do a bit of looking the two most common builder phobias have to be carbs and wiring.  It is worth it in the end though when take that first ride.  Looking back over all your builds which bike has been your favorite?

J: The Denver’s chop is the favorite as of now. My son Jimmy Jr. did the paint & body work so it was a father son thing. As for a hard tail & a long springer. This chop rides like a caddy. Would never build another chop with a 40 degree or better rake without a springer. It’s the difference between daylight & dark.

WJ:  Man I followed that whole build and it is unreal.  Anyone that wants to should head over to the HC.com builders section and take a look.  Electrics box alone is enough to blow a gear heads mind.  As I said before you not only build these bikes you make a lot of the parts yourself. So in order to make these bikes happen what is the tool in your shop you can’t live without?

J: I have a couple tools that I couldn't do without. One is a Leblond 13" gearhead lathe & the other is a Bridgeport milling machine. These machines were made back in the 60's so I don't know how it would be using a new machine. If push came to shove, I'd keep the lathe.

WJ:  I will say on a side note since I am rocking several of your parts myself I am really glad you have those tools.  Now I think we can all look at your work and it speaks for its self.  You have done some truly incredible motorcycles.  What is one tip for the new guys that will make life easier as they get started?

J:  A good tip for a newby or about anybody, is patience. I had to teach myself patience. When things went wrong or something didn't suit me, I'd go off.  Before I started building the Tennessee moonshiner, I made a commitment to myself that I would remain calm & finish the build, Yep, I had to walk away a few times & collect my thoughts but that's the first thing that I finished & was proud of. I was 50 years old before I owned my first bike, I believe that the family comes first & the toys later. I now have 3 bikes & 2 trikes, all are cb750 sohc. I like to collect the rare stuff.
 
WJ: Thanks again for your time.  I really appreciate it. 
 Like I said before guys Jimmy is a standup guy.  His work is second to none.  I have been lucky enough to end up with several of his parts all I can say is wow.  If you need something for your sohc he makes give him a shout he is Copperheadz at Hondachopper.com and his email is miner230@yahoo.com.  I can promise you will not be unhappy with the parts.  Here are some pics of his builds and parts.


Denver's Build
1975 Santee with a Drouins supercharger
 1975 C&G with a turbo charger
Triple Trouble
Current build 1973 Trike

Cast your little eyes on these a few of the must have parts crafted by Jimmy.


Thursday, October 23, 2014

October's Garage Girl


      This month’s Garage girl we salute the Rockabilly Pin Up.  In the last few years the Rockabilly movement has really gained some steam and as you can see that is not a bad thing.


Friday, September 19, 2014

Tucking in your chop for a long winters nap


Welcome back all you little gear grinding, grease guzzling, chopaholics.  I know what you are thinking I dropped the ball and have left yall hanging.  I have but the old wizardy one has had to focus on a few things this summer namely paying bills.  But such is the life of those of us who grind away at life.  Now that things are winding down I have a few ideas for articles I would like to do.  I will be wiring the trike in a week or so and will feature that as well as the process of doing my paint on a rattle can budget.  In the mean time I thought I would do a quickie on a subject we all hate, winter.  Like it or not old man winter will soon be laying his frosty hand on much of the land and I am sure he has already way laid some of the north of the border brethren.  The question always comes up when first getting into motorcycles how I store one correctly for the winter.   


Step one get down and dirty.  Change that oil and check all fluids.  Make sure all systems are in the best possible shape.  This is a key to keeping things good while at rest. 


Step two is Clean it.  I mean give it a good bath.  I know many people may think why well all of that road crud can have things in it that will do bad bad things in the long run.  So it is best to get it off there. 


Step three fill er up. I know this sounds odd but really fill that tank and put some stabilizer in it.  When things are in use they tend to not get nasty problems like rust nearly as bad.


Step four close up openings.  This refers to the pipes and the carbs.  Little stuff loves to get in there this can be as simple as closing the choke and putting a bag over the pipe with a rubber band.  This will keep the creepy and crawly boogers out. 


Ok this last part is a subsection depending on which kind of guy you are.  There are two for this part.  There is the I have easy access and plan to crank the bike once every week or two to keep things fresh and moving and the I actually have to store it guys.  For the first you can probably skip pretty much everything and be ok however maintenance is still a good winter habit and I would suggest getting a battery charging device like a battery tender to keep it fresh and ready.  Small price for sanity. 
Now if you are the second kind there are two steps I would suggest you consider.  First pull your carbs and clean them.  This new gas most of us get is shit.  It likes to break down and do really awful things.  Cleaning fresh liquid gas from carbs is so much better than letting it set up and become something more again to roofing tar.  Just pull em, drain em, blow out passages with compressed air, and put em back on.  Another step I take is remove the battery.  Lots of people will leave it in that is their deal but I have some truly nasty things happen because of batteries while something is being stored.  My philosophy here if the battery isn’t in there it can’t do nasty things.  Problem solved.  Of course there are many other things you can do as well be these are the basics that will make that first good riding day so much better come spring time.

Saturday, May 10, 2014

May Garage Girl Veronica Gomez


Getting Ready to Roll


Hello guys and gals it has been a minute since I was able to post.  The life of the weird and wonderful wizard at times gets a little too weird for even me lol.  But I digress I sat her pondering what to write about and it came to me.  As most of our country shakes or has shaken off the chill of winter it is time that we will all be hitting the road.  As you know our main focus is the build but we all need to remember that a huge part of riding, building, and enjoying motorcycles is maintenance.  Oh there it is that dirty word.  Assuming that you did what you need to do in order to protect your scoot for the winter there are a few steps to take to make sure your first trip out you spend more timing riding the bike than pushing it home.  Now is the perfect time to do those little checks.  No matter how much prep you did winter is always the perfect time for those garage gremlins to get at your ride.
1.       New gas.  This is a no brainer in particular with the ethanol in it now if you have much of winter at all the gas that set is gonna be funky.  Also not a bad time to spend the extra buck and get a new fuel filter.  It is amazing how many times a gummed up filter will leave you on the side of the road.   
2.       Fluids, check that brake fluid if you happen to rock a liquid cooled check that coolant too.
3.       Tune up.  In the weeks leading up to riding weather take the time to tune it up spark plugs, oil change with filter. 
4.       Check them tires and lube that chain.  Not only is it obvious that there is danger involved if either of these fail your ass is doing the walk of shame. 
5.       Cables this is often over looked but for a few bucks you can get some stuff called cable lube and trust me you spray it in there your cables work better and last longer  the good folks at http://cycleonemanufacturing.com/ carry it < and most anything else you need, its good stuff.
6.       Brakes.  Ckeck em for warping wear and function.  Riding is only fun if you can stop when you need too.  Injuries aside many a pair of clean skivvies have been ruined by bad brakes.
7.       Ok so assume everything checked out good on these basic steps if you are a home builder now is also the perfect time to double check nuts and bolts.   I know we all roll to the shop born to be wild playing our head and think we are the next Indian Larry but guys we all forget shit.  One missed bolt now is the difference between hmm I wonder how I missed that and fubar city.
I will leave it at that and say that soon I plan to do a write up on a few of these things.  Some guys might say oh come on it so basic but you got to remember we all learned at some point and no one is born knowing everything.  Until next time keep those sleds tuned and show them some love they will love you back. 
Wizard